SDK Setup
The SDK runs on both Linux (also including Windows Subsystem For Linux 2 - WSL2) and Windows, and setup of both systems are shown in the following two chapters.
To use the SDK, you will need:
The RIIM SDK downloaded from https://radiocrafts.com/
GNU Embedded Toolchain for ARM
CMake
Python
Ninja
Optionally, you may also want:
A terminal program to connect to the UART.
GNU Make, if you do not want to use Ninja (See Installing the MAKE Tool for details)
Windows setup
Installing the SDK
After downloading the SDK from the Radiocrafts web site, unpack the zip file to your desired folder. No real installation procedure is required for the SDK itself.
Installing GNU Embedded Toolchain for ARM
The toolchain can be downloaded from the official ARM web page at https://developer.arm.com/downloads/-/arm-gnu-toolchain-downloads . Radiocrafts recommends that you use the 11.3.Rel1 version - scroll down the ARM web page to find it.
Use the AArch32 bare-metal target (arm-none-eabi) variant.
Important
Ensure to check “Add path to environment variable” as shown in the figure below.
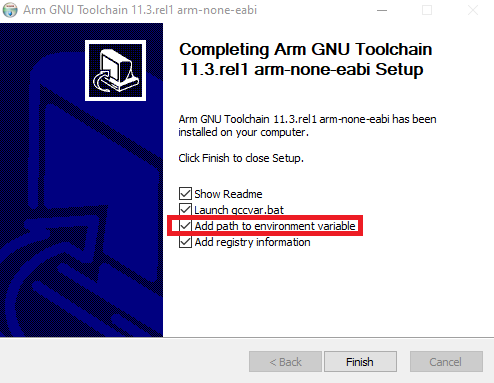
ARM GNU tools installation
Installing CMake
Go to https://cmake.org/download/#latest to download and install CMake.
Important
Ensure that you select Add CMake to the system PATH for all or current user(s) for CMake to be available from the build scripts as shown in the following figure
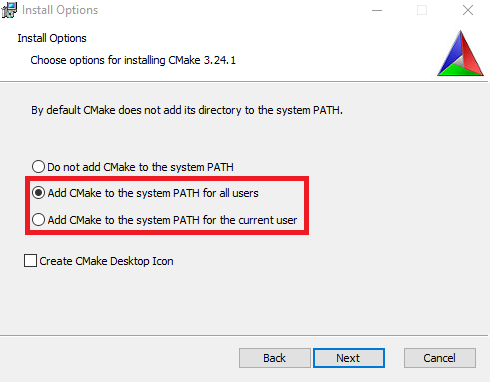
CMake installation
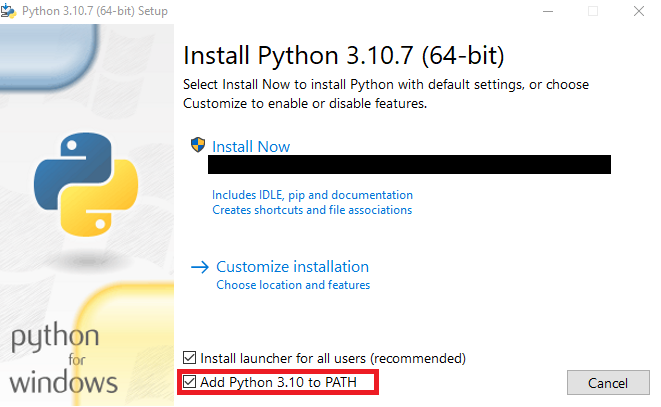
Installing Python
Go to https://www.python.org/ to download and install Python. Version should be at least 3.6.
Note
If Python is installed via the Windows Store, problems with pip installation may be encountered (when installing Ninja later). Installation from the official page is recommended.
Important
Ensure that you select Add Python x.xx to PATH during installation for Python and pip to be available. This is shown in the following figure
Installing Ninja
There are several ways to install Ninja. We will use pip in this document, but you may want to have a look at https://ninja-build.org/ for other methods. Using pip also ensures that paths are set up correctly.
Important
Python/Pip must be installed prior to Ninja
Open a command line (cmd.exe) or Windows Powershell and execute the following command
pip install ninja
Note
If pip complains with WARNING: The script ninja.exe is installed in ‘xxxxxx’ which is not on PATH. Consider adding this directory to PATH or, if you prefer to suppress this warning, use –no-warn-script-location. , you probably need to install Python from the official page instead of Windows Store.
Installing a terminal program
A terminal program is used to connect to the module via the UART. In windows, this connection will show up as a COM-port. See How Do I Find My UART Port on Windows? for details on finding the ports. Many different terminal programs are available, for instance Microsoft Terminal (https://github.com/microsoft/terminal) or Tera Term (https://ttssh2.osdn.jp/).
Installing the MAKE Tool
Warning
Make is not directly supported in RIIM SDK 3.3.0 and later versions. Ninja is used instead. However, advanced users familiar with make and CMake may still use it by using the Unix Makefiles generator provided by CMake
The MAKE tool can be downloaded from sourceforge.net here: http://gnuwin32.sourceforge.net/packages/make.htm Most users will need the package described on that page as «Complete package, except sources».
Other options for installing make includes MinGW and Cygwin. However, these options are outside the scope of this document.
Important
Remember to update the PATH variable if make is not found. See I am not able to use make on Windows
Linux setup
Installing the SDK
After downloading the SDK from the Radiocrafts web site, unpack the zip file to your desired folder. No real installation procedure is required for the SDK itself.
unzip RIIM_SDK.zip
Installing GNU Embedded Toolchain for ARM
You can install gcc-arm-none-eabi from the package manager:
sudo apt install gcc-arm-none-eabi
Or you can download a specific version from at https://developer.arm.com/downloads/-/arm-gnu-toolchain-downloads and follow the installation instructions
Installing Python
Go to https://www.python.org/ and download Python (or use your package manager). Version should be at least 3.6.
Installing a terminal program
A simple terminal program for linux is microcom. You can install it by typing
sudo apt install microcom
SDK Directory Structure
The SDK directory contains the following:
- docs/
The documentation
- Framework/
The SDK internals. don’t modify the content unless you know what you are doing.
- Framework/Linker/
Files used during linking.
- Framework/Platform/
Contains the RIIM platforms and scripts for flashing them
- Framework/Tools/
Contains the command line tools and scripts. These are described in detail later.
- Framework/User_API/
Contains the API header files
- ICI_Applications/
Your code as well as example ICI applications. This is where most users will work.
Example Structure and Naming Conventions
The examples contained in the ICI_Applications use a common structure and naming convention. The structure is like this:
My_App
├── Compile_And_Upload.bat           Automatic build script for Windows
├── Compile_And_Upload.sh            Automatic build script for Linux
├── Output                           Generated images to be transferred to module
│   ├── App_MyApp_Leaf_SB.bin         Image for the platform running on the SB
│   ├── App_MyApp_BorderRouter_BR.bin Image for the platform running on the BR
│   └── App_MyApp_MeshRouter_DB.bin   Image for the platform running on the DB
├── README.md                        Readme file in markdown format
├── README.pdf                       The same readme file in PDF format
└── SRC                              The source files to be built into images
    ├── CMakeLists.txt               CMake instructions
    ├── App_MyApp_Leaf_SB.c          Source file for the platform running on SB
    ├── App_MyApp_BorderRouter_BR.c  Source file for the platform running on BR
    └── App_MyApp_MeshRouter_DB.c    Source file for the platform running on DB
The naming convention of the source and image files is as follows: App_Description_Platform_Board.c
- Description
Describes the ICI application, such as: ADC, Accelerometer, Cloud, LargeNetwork
- Platform
Describes the RIIM platform it’s made for. RIIM has 3 platform types: BorderRouter, MeshRouter and Leaf
- Board
- Describes what board the image is supposed to run on. These corresponds to the 3 types of boards contained in the Development Kit from Radiocrafts. They can be:
DB Development Board
SB Sensor board
BR Border Router