Cloud To Sensor Prototype Network by RIIM
The RIIM network from Radiocrafts is an excellent platform to get real sensor data for your IOT cloud development.
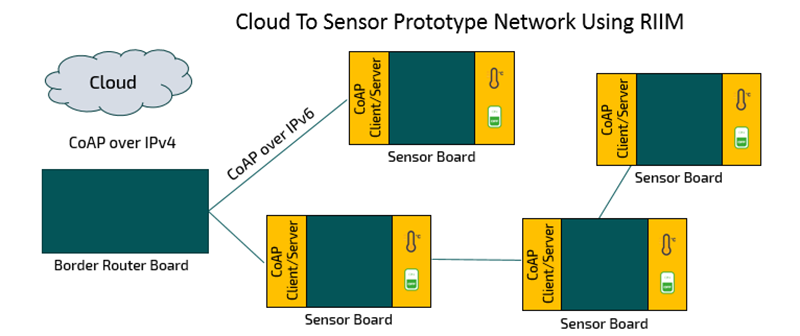
Each sensor is accessed using CoAP over IPv4, making the Cloud application generic in terms of target sensor network.

It is very simple to create your own Prototype Sensor Network
The tools you need are:
-
-
-
-
-
-
-
-
-
-
-
- One Border Router Board
- Sensor Boards (as many as you need)
- The SDK Software
- Antennas
- USB Cables
- Power Adapters
-
-
-
-
-
-
-
-
-
-
Once the network is set up, then each sensor can be accessed by the Border Router via IPv4 over Ethernet. We have a simple demo application with access from a Cloud platform called Thingsboard that will show you how an individual sensor is accessed. You can watch the demo here. (To be Released)
The RIIM Boards
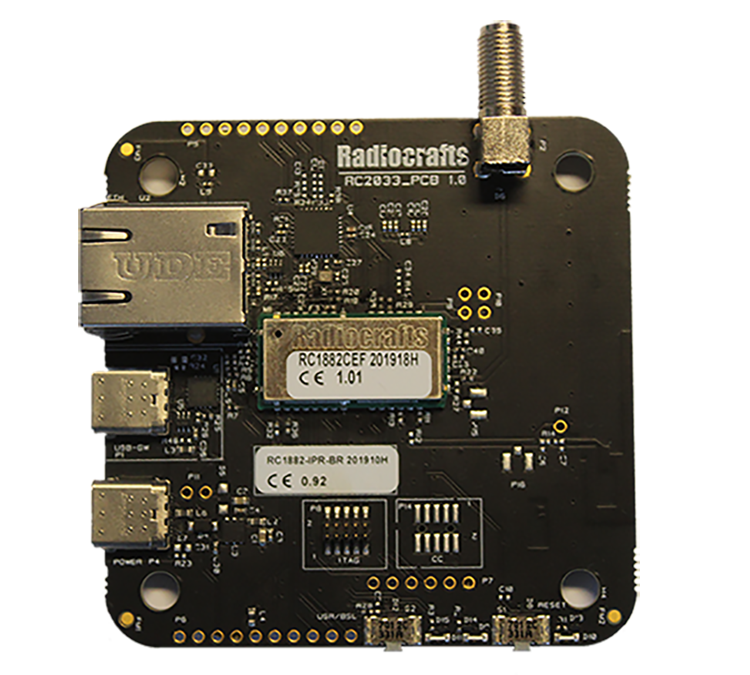
The Border Router Board has an IPv4 interface over Ethernet and is ready to go out of the box. You can access any sensor in the network and forward the data to your cloud application.
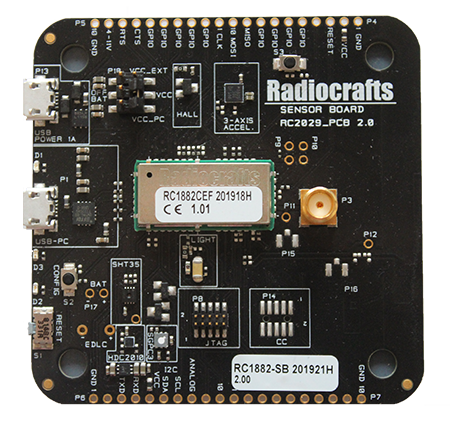
The Sensor Boards are populated with 7 industry standard sensors:
Sensor | Supplier | Description |
SHT35 | Sensirion | Temperature and humidity sensor |
HDC2010 | Texas Instruments | Temperature and humidity sensor |
ALS-PT-315C | Everlight | Analog light sensor |
SL353LT | Honeywell | Hall detector |
LIS3DE | ST Microelectronics | Accelerometer |
Blue LED | Many | LED, controlled by the GPIO |
SGPC3 | Sensirion | VOC gas sensor (Air quality sensor) |

Border Router Board

Sensor Board
The RIIM Network
The RIIM Network is a fully automatic setup (mesh topology) using the pre-loaded firmware on the boards. You can see how to setup the RIIM network with pre-loaded firmware on the boards here.

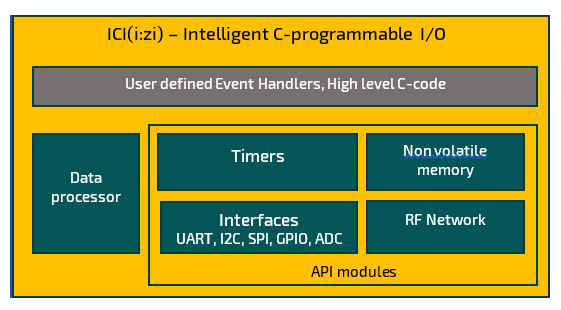
The Boards come pre-configured for sensor readings. The pre-loaded firmware configuration of the radio and/or the sensor readings can easily be modified using any text editor and the RIIM SDK. The configurations are done through Radiocrafts’ ICI Framework. ICI, which is available on all RIIM boards, allows the user to access the hardware interface and manipulate the data on the boards before sending it on to the next stage. This means that any sensor/control unit can be interfaced to directly to the RIIM boards. One major benefit is that the sensor interfaces can be updated when the network is already deployed using Over the Air (OTA) updates, creating a future proof solution with room for new or updated sensors and control units.
Radiocrafts has detailed the process for configuring your pre-loaded firmware in a video. You can watch the video here.
You can explore and test a number of ICI example applications using the RIIM SDK, created to help the customer better understand the benefits and functionality of ICI. The examples include:
- OTA update example – Demonstrates the efficient Over-The-Air functionality.
- Large network example – This example was made to see the formation, topology, and status of a large (or small) network.
- UART example – This example demonstrates the use of UART, including, UART setup, UART transmission and callback function, and UART reception with callback function and timeout.
- Interfacing all sensors on the sensor board – This example interfaces all functions on the Radiocrafts sensor board. The application reads data from all sensors present on the sensor board.
- Cloud Example – This example demonstrates how you can connect the RIIM development kit to the cloud. Radiocrafts uses “ThingsBoard” as a cloud application in this example.
- Local Sensors Example – This example demonstrates how to interface sensors via various interfaces.

Your sensor boards can be configured as:
- a Mesh Router – Can forward data to and from its parent nodes to its child nodes. The mesh router nodes collect and forwards data to local sensors and actuators. They also serve to extend the network if needed.
- A Leaf Node – sits at the end of the network and has no mesh routing functionality. It collects and forwards data to and from local sensors and actuators up to its parent node. The Leaf node can be put to sleep for very low power consumption (4.7 uA), ideal for battery operated sensor nodes.
The RIIM network benefits include:

CoAP(s) interface to the cloud

"Global" support, software configurable 868 /915 MHz

Up to 1000 sensor boards

Very Low Power

200 meter range between nodes in an urban environment

29 mesh hops supported. Cover an urban area of 12 x 12 km squared
Network Setup Overview
The network setup is quick and easy!
- First, you need to define the IP address of the cloud application and power up the boards. As mentioned previously, the boards are pre-configured for sensor readings. The Border Router is powered up from a PC, however, the sensor boards can be powered up by any power adaptor.
This process is described in the RIIM SDK Quick Start which you can read here. Radiocrafts has also prepared a video detailing this process. The video can be watched here.
- If you want to modify the factory loaded configuration on the boards, you can easily do so by upgrading your ICI application using any text editor and the RIIM SDK. You can configure the Sensor Boards to read any combination of sensors present on the board.
This process is described in the RIIM SDK User Manual which you can read here. Radiocrafts has prepared a video detailing this process as well. The video can be watched here.

- The Border Router can then access each sensor via IPv4 over Ethernet and forward the sensor data to your cloud application.
- Adding more sensor nodes is done by a simple configuration of the new sensor board and then putting it where it is needed. Just make sure the sensor board is within reach of another node in the network.
This process is also described in the RIIM SDK User Manual. Additionally, Radiocrafts has also prepared a video detailing this process. The video can be watched here. (To be Released).
And you are done. You have now setup a cloud to sensor prototype network using RIIM.
Read more about the RIIM network here.
Download the RIIM SDK here.
Contact Radiocrafts here if you want more information.
